Integrating the Framed Nature Embroidery Design into Your Creative Workflow
Embroidery continues to evolve as both a personal craft and a professional design tool, especially in the world of custom apparel, home decor, and branded merchandise. Among the latest trends is the Framed Nature Embroidery Design, a botanical-inspired set that brings a fresh, artistic touch to any project. Whether you're a hobbyist, small business owner, or creative professional, understanding how to incorporate this design into your workflow can enhance both your process and your final product.
Understanding the Framed Nature Embroidery Design
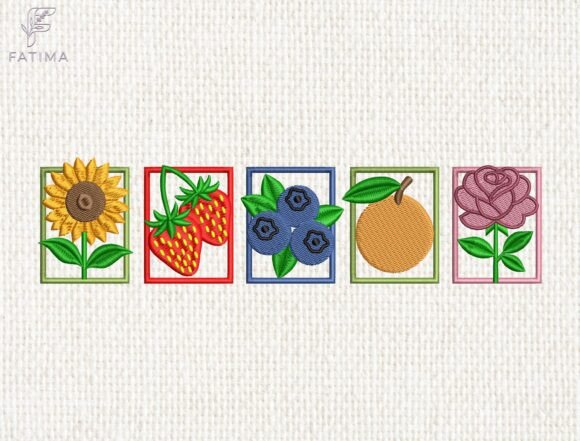
The Framed Nature Embroidery Design is a collection of five distinct botanical motifs—sunflower, strawberry, blueberry, orange, and rose—each framed in a modern satin border. What sets this set apart is the breakout effect, where natural elements like leaves and fruit extend beyond the frame, creating a dynamic, three-dimensional appearance. These designs are not just visually appealing but are also engineered for high-quality stitching, with dense fills and crisp outlines that highlight the textures of petals and fruit skins.
This design set is particularly useful for those who want to add a touch of organic elegance to their work without compromising on technical precision. The balance between artistic composition and clean digitization makes it suitable for a wide range of applications, from kitchen linens to seasonal apparel and personalized gifts.
How It Fits Into the Creative Process
Whether you're working on a personal project or preparing items for sale, the Framed Nature Embroidery Design can serve as both a focal point and a functional element in your design pipeline. Here's how it integrates into different stages:
Pre-Project Planning
Before you begin stitching, it's important to consider where and how the design will be used. Think about fabric type, garment style, or home decor item you're embellishing. The vibrant color palette of the design works best on neutral or lightly colored backgrounds, so selecting the right base material is essential. Planning also includes verifying hoop size compatibility and thread color preferences to ensure the final look aligns with your vision.
During Execution
Once you've selected the appropriate design file and loaded it into your embroidery machine, preparation becomes key. Make sure your stabilizer is appropriate for the fabric weight and that your tension settings are optimized for dense stitching. The high-density fill in these designs ensures a smooth, professional finish, but proper setup prevents puckering or distortion, especially around the breakout elements.
Post-Production Integration
After stitching, consider how the embroidered piece will be used. If you're creating custom aprons or tote bags, you may need to coordinate with other production steps such as cutting, sewing, or labeling. The Framed Nature Embroidery Design can be a stand-alone feature or part of a larger design layout, so planning for additional embellishments or text elements can enhance the overall aesthetic.
Workflow Compatibility and Tools
For those using embroidery as part of a broader creative or business workflow, the Framed Nature Embroidery Design integrates smoothly with a variety of tools and platforms. If you're using embroidery software like Wilcom, Embird, or Hatch, you can easily resize, recolor, or reposition the design to fit specific project requirements. Additionally, if you're producing items for sale, these designs can be incorporated into product mockups for online listings or marketing materials.
For small business owners or entrepreneurs, the design can be part of a seasonal product lineup. For example, the sunflower design could be featured in summer-themed merchandise, while the rose might be ideal for Valentine’s Day or Mother’s Day collections. This level of flexibility supports a consistent brand aesthetic across multiple product lines.
Practical Implementation Tips
- Test on Sample Fabric: Before committing to your final material, stitch a test version on a similar fabric to check for tension and clarity.
- Use Quality Stabilizers: High-density stitching requires strong support to prevent puckering. Consider using a combination of cut-away and tear-away stabilizers for optimal results.
- Organize Design Files: Keep your embroidery files well-organized by category (e.g., botanical, seasonal, home decor) to streamline future projects.
- Batch Production: If you're making multiple items, group similar designs together to reduce setup time and increase efficiency.
- Coordinate with Other Assets: Pair the Framed Nature Embroidery Design with complementary fonts or graphic elements for packaging or branding purposes.
Long-Term Use and Quality Control
One of the advantages of the Framed Nature Embroidery Design is its durability and timeless appeal. Because it's professionally digitized with clean outlines and smooth transitions, it holds up well through repeated use and multiple wash cycles. This makes it a reliable asset for creators who want to maintain consistent quality across different batches or seasons.
However, like any digital asset, it's important to maintain a backup of your files and periodically check for updates or compatibility with newer machines or software versions. Keeping a record of successful settings (e.g., thread colors, stabilizer types, hoop sizes) can also streamline future projects and reduce trial-and-error time.
Final Thoughts on Integration
The Framed Nature Embroidery Design is more than just a decorative element—it's a versatile tool that fits seamlessly into various stages of the creative and production workflow. Whether you're enhancing personal projects or building a product line for sale, its combination of artistic flair and technical precision makes it a valuable addition to your embroidery library. By understanding how to prepare for, execute, and integrate this design into broader workflows, you can maximize both efficiency and aesthetic impact in your work.